This article provides Ax technical consultants step by step procedure of executing Microsoft Dynamics Ax 3.0 to Microsoft Dynamics Ax 2009 SP1 upgrade. It also suggests some steps which can be followed for enhancing the upgrade performance.
I recommend get Ax at Ax 3.0 SP3 or Ax 4.0 level to start upgrade. Or If you have country specific DIS layer involved than you first need to take Ax to Ax 3.0 SP6 first as there might be issues of some db schema changes in different country specific DIS and some data upgrade scripts not included in Ax 2009 to handle DIS db schema changes below Ax 3.0 SP6. Identify cases where this situation exists and create an upgrade script to handle the situation automatically, or copy the data manually from the Ax 3.0 database to the Ax 2009 database after the upgrade.
Note: Not all the countries affected with this.
Upgrade
It is divided in two parts, Code Upgrade and Data Upgrade. You can do both these steps in one go but I will say go one by one, starting with code upgrade first and then moving to data upgrade.
Security rights needed
User performing upgrade process must have Administrative rights.
DATA UPGRADE
So after completing the code upgrade, you can start with your data upgrade. Here in this process you upgrade your Ax 3.0 db schema & data to Ax 2009 db schema & data.
Step 1
- Backup Ax 3.0 database.
Step 2 (Goto step 8 if upgrading Ax 4.0)
Prepare Ax 3.0 database for data upgrade.
- Run the Pre-Upgrade Duplicate Detection form, available on CustomerSource, to identify any duplicate record IDs that exist in Ax 3.0 database.
- Import two XPOs from DatabaseUpgrade folder in Ax 2009 installation media for preparing Ax 3.0 database for data upgrade.a) PrivateProject_UpgradeColumnList.xpo, for 32 bit (int data type) to 64 bit (int64 data type) field (RecId) conversion.
b) PrivateProject_LeftJustified.xpo, for removing any trailing spaces from fields.Note: For performance point of view, one can choose to run LeftJustify directly on the Ax 2009 db. We will run this script after converting (AxDbUpgrade.exe) Ax 3.0 db to Ax 2009 db but before starting the Ax 2009 AOS. For now just run LefJustify.xpo (Main job), click on “Display Command” button and copy commands to text file.
Step 3 (optional)
- For performance, purge all user data and logs of Ax 3.0. For example Under AOT–Menu items–Action, open and run the following forms to clean up the respective types of data:
SysUserLogCleanUp, SysDatabaseLogCleanUp, ProdJournalCleanup, InventJournalCleanUp, ProdTableCleanUp, SalesParmCleanUp, PurchParmCleanUp, LedgerJournalCleanUp
Step 4
- Create an empty database for Ax 2009 in SQL Server 2005 / 2008 (Target System).
- For performance (optional):
a) Set initial data and log file size so that they don’t increase while we do data upgrade.
b) Set recovery model to Simple.
Step 5
- Run AxDbUpgrade.exe from DatabaseUpgrade folder in Ax 2009 installation media.
For performance, you can run this in multithreaded mode: For example to run this tool in 10 threads: from the command prompt run this command AxDbUpgrade.exe P/10 . In our test scenario we have both Ax 3.0 database (Source) and Ax 2009 database (Target) on the same machine. Running this tool from network may hit performance.
Important: The major change in this tool is if an error occurs while running AxDbUpgrade, you can continue after rectifying the error. The tool will continue where you left. ![]()
Step 6
- Run LeftJustify script saved in step 2 on the Ax 2009 database (step 4).
For performance, we can split this file in multiple parts and can utilize the IO capacity of the system.
Step 7
- Now our Ax 2009 database is ready to be upgraded. So, take backup of this newly created database.
Step 8
- Run Ax 2009 setup file from installation media to start upgrade checklist.
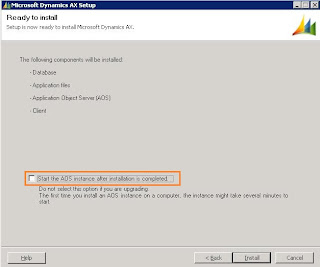
Select only Application and AOS for installation.
On next couple of screens select the existing database (choose the database created in step 4 or your existing Ax 4.0 database.),We don’t want to start AOS after installation, so clear the Start the AOS instance after installation is completed check box.
Step 9
- Install Ax 2009 SP1 without starting the AOS.
- Install latest Ax 2009 Role-UP if you want to, without starting the AOS.
- Install any other Microsoft Dynamics Ax 2009 solutions. For example if your Ax 3.0 instance uses Professional Services Automation (PSA) and you also want to upgrade this, than you need to install latest PSA for Ax 2009 SP1 now without starting the AOS. This also applies to any other third party solution you want to upgrade that have their Ax 2009 SP1 version ready.
Step 10
- Copy your upgraded *.AOD (your custom layers only) files from the Ax 2009 (Code upgrade environment) to this new Ax 2009 data upgrade environment’s application directory.
- Start the AOS.
Step 11
- Open Ax 2009. Upgrade checklist will come up with the steps to be processed in Ax for data upgrade.
a) Compile Application
b) License Info
c) Pre-synchronize
d) Synchronize database
e) Post-synchronize
f) Configure system accounts
g) Finalize Enterprise Portal upgrade
h) Upgrade additional features
Step 12
- Test your customizations in Ax 2009 SP1.
Step 13
After the upgrade and testing, it’s now time to delete obsolete application objects.
- Disable the Keep update objects 4.0 (SysDeletedObjects40) and Keep update objects 4.1 (SysDeletedObjects41) configuration keys. Disabling these keys will cause deletion of obsolete application objects that have the prefix DEL_.
Feel free to post your feedback / comments / queries here.
References:
Ax 3.0 SP* to Ax 2009 SP1 Upgrade – Part 1
Microsoft Dynamics AX 2009 Upgrade Guide


